During the past weeks I was involved in developing BoilerplateJS, a JavaScript reference architecture for large scale web applications. BoilerplateJS was developed based on RequireJS modules. I was involved in setting up unit testing for BoilerplateJS. One of our main requirements was to mock RequireJS module dependencies. After a lot of searching I came across testr.js. Testr.js can be used with almost any unit testing framework.

Assume that we have the following setup:

+-index.html
+-main.js
+-module1.js
+-dependencies/
+-----dependency1.js
+-libs/
+-----require.js
+-----testr.js

Index file contains the links to the scripts. Note that you have to import testr.js after importing RequireJS.


<script type="text/javascript" src="./libs/require.js" data-main="tests"></script><script type="text/javascript" src="./libs/testr.js"></script>

My dependency1.js file contains:

define([], function(){
	var dep = function(){
		this.getText = function(){
			return 'Original Dependancy';
		};
	};
	return dep;
});

It contains a getText() method which returns a string.
Lets assume that module1.js has used the above dependency as follows:

define(['dependencies/dependancy1'], function(Dependancy1){
	var module = function(){
		this.run = function(){
			var d1 = new Dependancy1();
			console.log(d1.getText());
		};
	};
	return module;
});

You can see that when the run method of Module1 is called, it calls the getText() method of the dependency. Therefore if you execute the run method of Module1, you should see ‘Original Dependancy’ on the console.
Our aim in this scenario is to replace dependancy1 with a mock object during run time.
Our tests.js file contains:

require(['module1'], function(){

	var fakeDep = function(){
		this.getText = function(){
			return 'Fake Dependancy';
		};
	};

	var Module1 = testr('module1', {
		'dependancies/dependancy1':fakeDep
	});

	var m1 = new Module1();
	m1.run();
});

Here, we create a fakeDep object that has the same methods as the original dependency, and then passes it to testr function with the related file path. Now, instead of loading the original dependency, testr.js loads the module with the provided fake dependency. When you run the above index.html, you will see the fake dependency being executed and ‘Fake Dependancy’ being printed on the console.

I joined 99X Technology as an intern and as a technology enthusiast, looking for opportunities to learn new things and to make cutting edge solutions. Soon I was introduced to a new world of JavaScript where it is used not to do small website hacks and data validation, but to build full-fledged software products.

Our clients demand software solutions that are cross platform, and solutions that support all types of devices. Our realization is that web applications that are dynamic and responsive would be the ideal solution for such situations. And we believe that JavaScript has the potential to cater these situations. There are plenty of libraries that are out there to address many individual aspects of JavaScript application development. But what lacked were some kind of architecture and a set of design patterns to address common problems that JS developers are facing.

Inspired by some of the great presentations such as Nicholas Zakas’ “Scalable JavaScript Application Architecture” and with the experience of few large scale JavaScript projects at 99x, development for a reference architecture for single paged web applications with JavaScript was started. Me and two other interns at 99X, Himeshi and Asanka were lead by Hasith (a wonderful guy with a wealth of knowledge and experience), were involved in this project, which is now released as BoilerplateJS.

BoilerplateJS is a reference architecture intended to be used in large scale web applications. It combines a set of industry leading JavaScript libraries and a set of great design patterns. BoilerplateJS would be the starting code for your JavaScript project, where you can add in and remove parts according to your requirements.

Every decision and every line of code that ended up in BoilerplateJS were carefully reviewed and made in the best and the simplest possible manner. Careful thought went into making BoilerplateJS loosely coupled, and flexible.

My intention of this post was to give a sneak peek in to the development of BoilerplateJS. More information about BoilerplateJS is available on http://boilerplatejs.org/. And do have a look at Hasith’s blog post at http://blog.hasith.net/2012/08/boilerplatejs-is-out.html.

If you have signed up in a couple of mailing lists, and your Facebook notifications are pouring in, managing your inbox is pretty hectic. It’s even worse if you couldn’t check your email for a couple of days. Gmail has provided some handy tools to make your life a little bit easier.

Priority Inbox:
Use this right, and I’m sure checking your email would be a whole lot easier. Gmail Priority Inbox automatically identifies your important emails and sorts them separately, so you can focus on those emails that matter to you most. Gmail predicts which messages are important to you based on several facts such as who you email, which messages you reply to, etc. And you can help Gmail predict by marking your emails as important or not. It does take some time for you and Gmail to get adjusted, but after that Gmail predicts your important emails accurately.

Checkout this video introducing Priority Inbox

Check this out for more information.

Labels and Filtering:
Gmail allows you to label your emails. You can do this drag and dropping a label to your messages.

You can create labels and manage your emails easily. With Gmail’s filtering you can automatically add labels to your emails.

Let’s take an example; I want to label all my emails from Facebook under a label “Facebook”
Open an email you received from Facebook, and under “More Actions”, click “Filter messages like these”.

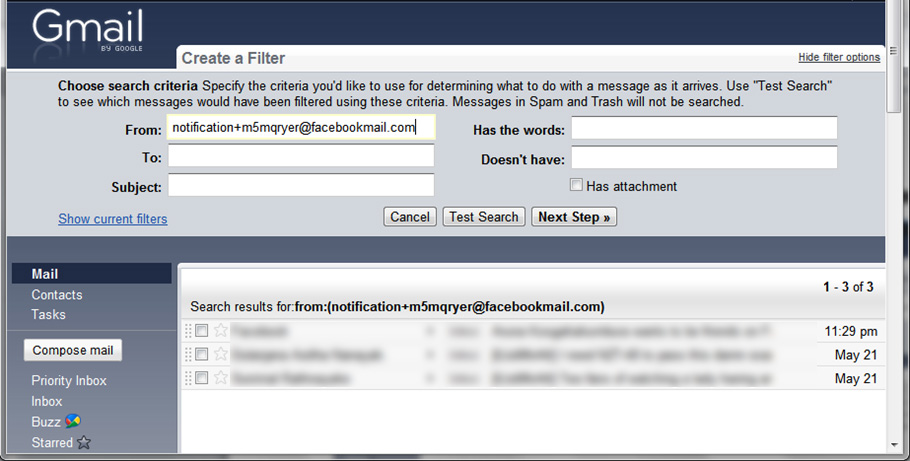
Then you can specify any other criteria that you need, and on the bottom you will see a list of emails that match your criteria.

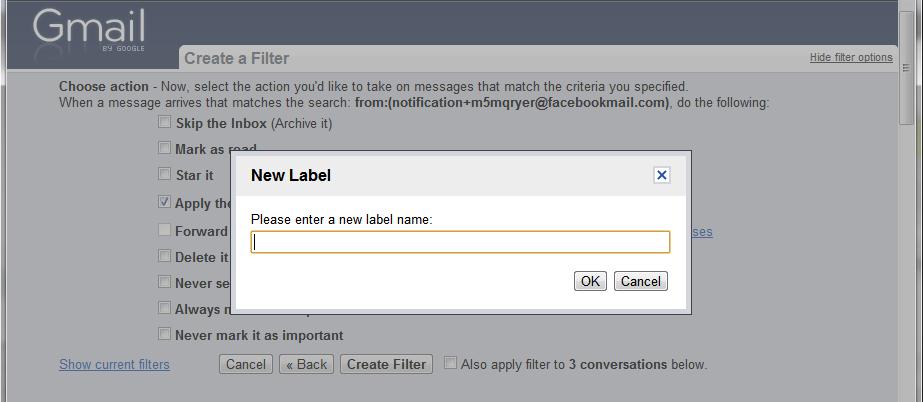
In the next step, check Apply the label. You can select an existing label or create a new label.

If you want the label to be applied to the currently filtered emails check “Also apply filter to…” and click “Create Filer”
And you will see that the filter is applied to the emails from Facebook. Similarly you can add filters to filter all your mailing lists.
It will take you sometime to setup all these filters, but believe me, it’s worth it.

Often in many of our applications, we need to load and display images. It could be a banner image that you load on top of each window, or the photo of a user that you received over a network which you want to display on a JFrame. A neat solution to this problem can be achieved by drawing the image on a JPanel and placing it among your other GUI components.

In this post I will explain how to create a GUI component which will display an Image object using a JPanel. The following is the code for the JPanel. You can place it among your other GUI components, and when you need to display an image, call the setImage() method with the Image object as the parameter.

package imagepanel;

import java.awt.Graphics;
import java.awt.Image;

/**
 *
 * @author Janith (http://cyberasylum.wordpress.com/)
 */
public class ImagePanel extends javax.swing.JPanel {

    Image image;

    /** Creates new form ImagePanel */
    public ImagePanel() {
        image = null;
        initComponents();
    }

    public void setImage(Image image) {
        this.image = image;
        this.repaint(); //makes a call to the pain() method
    }

    @Override
    public void paint(Graphics g) {
        if (image == null) {
            return;
        }
        g.drawImage(image, 0, 0, this.getWidth(), this.getHeight(), this);  //draw our image over the full area of the JPanel
    }

    private void initComponents() {
        setPreferredSize(new java.awt.Dimension(200, 200));
        setLayout(null);
    }
}

Now you can place this panel in a JFrame, and display images. Assume I have an instance of the above class named as imagePanel, and then I can display the image by:

Image myImage = ImageIO.read(new FileInputStream("test.jpg"));
imagePanel.setImage(myImage);

Click here to download the complete project file of the above code, which also includes a JFrame to test it.

When building a client – server based application, we need to send objects between the client and the server applications. And java provides two great mechanisms to achieve this: Object Serialization and Sockets. Once you know the basics of these two mechanisms, putting them together is not very hard. However there are some pitfalls that you need to avoid.

For this example I will make a small application.

The client application: will connect to the server and pass objects to the server. The passed objects will contain a String which the user entered on the console.

The server application: will echo the messages back to the client.

I assume you know a bit about object serialization and socket programming. But to give a brief introduction about serializing objects:

The object needs to implement the ‘Serializable’ interface. If you are going to serialize an object which is composed of many other objects, all those nested objects need to implement the ‘Serializable’ interface as well. If you happen to get a “java.io.NotSerializableException”, then it means you are trying to serialize an object that does not implement the Serializable interface. Most of Java’s objects do implement this interface.

When you have a ‘Serializable’ object with you, you can write it using the ObjectOutputStream.

ObjectOutputStream out = new ObjectOutputStream(/*Some output Stram*/);
out.writeObject(/*Some Serializable Object*/);
out.close();

To read the object the ObjectInputStream can be used:

ObjectInputStream in = new ObjectInputStream(/*Some input Stram*/);
/*Some Serializable object*/  =  in.readObject();
in.close();

Now let’s get into the example. I have created a ‘Message’ object which will be used to communicate between the server and the client. Basically the server and client will send ‘Message’ objects to each other.

Message class:

import java.io.Serializable;

/**
 *
 * @author Janith (http://cyberasylum.wordpress.com/)
 */
public class Message implements Serializable{

    private String message;

    public Message(String message) {
        this.message = message;
    }

    public String getMessage(){
        return message;
    }
}

The server application will wait for a connection, read the objects from the socket and reply,

Server Class:

import java.io.IOException;
import java.io.ObjectInputStream;
import java.io.ObjectOutputStream;
import java.net.ServerSocket;
import java.net.Socket;

/**
 *
 * @author Janith (http://cyberasylum.wordpress.com/)
 */
public class Server {

    private static final int PORT = 5000;

    public static void main(String[] args) {
        ServerSocket serverSocket = null;
        try {
            //Creates a new server socket with the given port number
            serverSocket = new ServerSocket(PORT);
        } catch (IOException ex) {
            System.out.println("Error occured while creating the server socket");
            return;
        }

        Socket socket = null;
        try {
            //Waits untill a connection is made, and returns that socket
            socket = serverSocket.accept();
        } catch (IOException ex) {
            System.out.println("Error occured while accepting the socket");
            return;
        }
        //Now we have established the a connection with the client
        System.out.println("Connection created, client IP: " + socket.getInetAddress());
        ObjectInputStream in = null;
        ObjectOutputStream out = null;
        while (true) {
            try {
                if (in == null) {
                    in = new ObjectInputStream(socket.getInputStream());
                }
                Message message = (Message) in.readObject();
                System.out.println("Client said: " + message.getMessage());

                //Send a reply to the client
                if (out == null) {
                    out = new ObjectOutputStream(socket.getOutputStream());
                }
                out.writeObject(new Message("Message recieved: " + message.getMessage()));
                out.flush();
            } catch (Exception ex) {
                System.out.println("Error: " + ex);
            }
        }
    }
}

Client Class:

import java.io.ObjectInputStream;
import java.io.ObjectOutputStream;
import java.net.Socket;
import java.util.Scanner;

/**
 *
 * @author Janith (http://cyberasylum.wordpress.com/)
 */
public class Client {

    private static final String SERVER_IP = "127.0.0.1";
    private static final int SERVER_PORT = 5000;

    public static void main(String[] args) {

        Scanner scanner = new Scanner(System.in);   //to read text from the console
        Socket socket = null;
        try {
            socket = new Socket(SERVER_IP, SERVER_PORT);
            System.out.println("Connected to server!");
        } catch (Exception ex) {
            System.out.println("Error connecting to server: " + ex.getMessage());
        }

        ObjectInputStream in = null;
        ObjectOutputStream out = null;
        while (true) {
            try {
                if (out == null) {
                    out = new ObjectOutputStream(socket.getOutputStream());
                }

                //read a string
                System.out.println("Enter a message: ");
                String str = scanner.next();

                //send it to server
                out.writeObject(new Message(str));
                out.flush();

                //get the reply from the server
                if (in == null) {
                    in = new ObjectInputStream(socket.getInputStream());
                }
                Message message = (Message) in.readObject();
                System.out.println("Server said: " + message.getMessage());

            } catch (Exception ex) {
                System.out.println("Error: " + ex);
            }
        }
    }
}

You can download the Netbeans project folder of this project from here (http://dl.dropbox.com/u/7290180/Serialization.rar).

Run the server part first and then run the client program.

A word of warning (and perhaps the most important part of this post)

The constructor of the ObjectInputStream ‘wait’s until the ObjectOutputStream of the other side to write a header. So if you try to construct the ObjectInputStream at the very beginning of both client and server program, you will end up in an ugly dead lock! Basically the client side will wait until the server to create its end of the stream, and the server side will wait until the client to create its end of the stream, and both sides will wait forever!

So, how do we solve this?

You should decide which side initiates the connection. i.e. you should decide which side would send an object first, and the other side should be prepared to read that. In the above example, the client sends the first message (so on the client side, first the ObjectOutputStream is created and on the server side, the ObjectInputStream is created). So I guess it would be a good rule of thumb to create the object input and output streams just before you use them.

Finally, in the above example the server is able to handle only one connection at a time, and that would be very inefficient for a server. So I have uploaded a better version of the above program where the server can handle multiple connections simultaneously using threads. Click here (http://dl.dropbox.com/u/7290180/SimpleClientServer.rar) to download the Netbeans project folder of the improved client server project.

I know this is a very long post, and hope I didn’t make it boring :). Hope you will find this useful.


For this example I will make a small application.

The client application: will connect to the server and pass objects to the server. The passed objects will contain a String which the user entered on the console.

The server application: will echo the messages back to the client.

Saving and retrieving files is a common problem when it comes to writing programs that has a database back end. In this post I will show you how to save and retrieve image files to and from a MySQL database, using Java. This method can be used to store any file in a database.

The Database:

For this example I will create a database called ‘DB’ and a table called ‘images’ where I will store the files. I use wampserver as my database manager.

The format for the ‘images’ table is as follows:

Index    :      INT
Photo    :      MEDIUMBLOB

The data type BLOB can be used to store byte values. There are four such data types available, namely TINYBLOB, MEDIUMBLOB, BLOB, LONGBLOB. Check here to find out the maximum sizes supported by each data type.

Java Program:

The following java program reads an image file (test.jpg) and saves it in the database in a record with index as 5. Then it reads back all the records that are in the table, and stores those images back on the hard disk.

Make sure you have installed MySQL Connector/J. If you are using NetBeans, you can add MySQL JDBC Driver to you libraries folder.

import com.mysql.jdbc.PreparedStatement;
import com.mysql.jdbc.Statement;
import java.awt.image.BufferedImage;
import java.io.*;
import java.sql.*;
import javax.imageio.ImageIO;

public class Main {

	public static void main(String[] args) {
		try {
			Class.forName("com.mysql.jdbc.Driver");
			String url = "jdbc:mysql://localhost:3306/mysql";
			Connection con = DriverManager.getConnection(url, "root", "");
			System.out.println("Connected to db");

			//saving the image
			PreparedStatement psmnt = (PreparedStatement) con.prepareStatement("INSERT INTO DB.images VALUES(?,?)");
			psmnt.setInt(1, 5);
			File f = new File("test.jpg");
			psmnt.setBlob(2, new FileInputStream(f), f.length());
			psmnt.executeUpdate();
			System.out.println("Image saved in DB");

			//retrieving it

			Statement stmt = (Statement) con.createStatement();
			ResultSet rs = stmt.executeQuery("SELECT * FROM DB.images");
			int count = 0;
			while (rs.next()) {
				InputStream is = rs.getBinaryStream("photo");
				BufferedImage image = ImageIO.read(is); //the image is read in
				//store it back again as a file
				ImageIO.write(image, "jpg", new FileOutputStream("recived" + count + ".jpg"));
				count++;
			}

			System.out.println(count+" images saved on disk");
		} catch (Exception ex) {
			ex.printStackTrace();
		}
	}
}

If you are trying to upload a large file, sometimes you might get a ‘packet size too large’ exception. You can increase the ‘max_allowed_packet’ variable of your server. Check here to find out how to do this.

If you want to know how to save, send and receive Java Image objects over a network have a look at this. It explains how to convert an Image object to a byte array. This byte array can be saved in an SQL database in a BLOB type data field.

Happy Coding! Continue reading

During the previous week I found out some tricks and tips in assembly, and thought of sharing them in this brief post.  I hope you will find these useful. I used NASM compiler to compile these codes.

Clearing a register:

Suppose you want to clear the ax register. XOR’ing it with itself will set all the bits in the register to zero.

xor ax, ax

Printing a single character on screen:

The interrupt 0x10 will print a given character on screen. The following code can be used to print a single character on screen.

mov al, '@'     ; character or the ASCII code of the character to be printed
mov ah, 0x0e    ; video – teletype output
int 0x10

Extracting some bits from a register:
Suppose you want to extract bits 3 and 4 of the AX register, and then print the decimal value on screen. The following code can be used to achieve this.
‘AND’ the register with a binary number which contains 1’s in the bit positions you want to extract. For our example it would be 0b0000000000011000 or 0x0018 (in hexadecimal). Then shift it right until our bits are the right-most bits. Then add 4b to it to get the ASCII number (ASCII value of ‘0’ is 48)

and ax, 0x0018    ; mask out bits 3 – 4
shr ax, 3         ; shift it right 3 times
add ax, 48        ; add 48 to get ASCII character
mov ah, 0x0e      ; print it
int 0x10

Remember the above code will work only if you are going to print values less than 9. If you want to convert a value more than 9 to decimal this will not work (I hope you understand why it doesn’t work 😉 ).

Printing out a register in binary:
For most of our debugging work, we will need to print the contents of a register in binary format. The following code can be used to print the contents of the CX register.

_print_reg:
;print the CX reg
push dx              ; save registers dx,ax,bx
push ax
push bx
mov dx, cx
mov cx, 16           ; loop for 16 times
print_loop:
    mov ax, 32768    ; set  ax = ob1000....
    and ax, dx       ; mask out the MSB of dx and store it in ax
    shr ax, 15       ; shift it to right 15 times
    add al, 48       ; add 48 to get the ASCII (would be either 0 or 1
    mov ah, 0x0e
    int 0x10         ; print it out
    shl dx, 1        ; shift left dx by 1
loop print_loop

pop bx;              ; restore the registers
pop ax
pop dx
ret

Hope these few tips will be helpful. That’s all for now :)


Have you ever wondered how to create those textual user interfaces that appear on console type windows? In this post I will explain how to create some simple user interfaces in C under Windows. With some simple coding, and a little bit of patience you will be able add some GUI elements to your C programs. However the following examples are only for windows operating systems. First let us take a look at some interfaces that I have done.

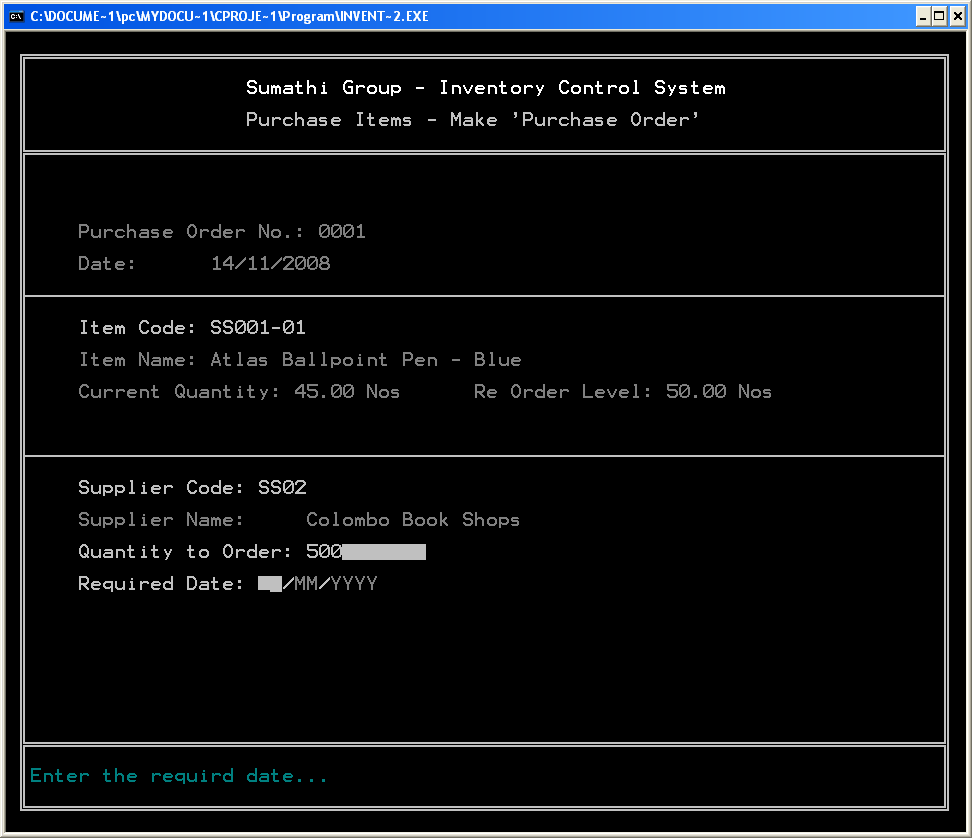
This shows a Stock Controlling System that I did as a class project. It has text boxes and message boxes and tables.
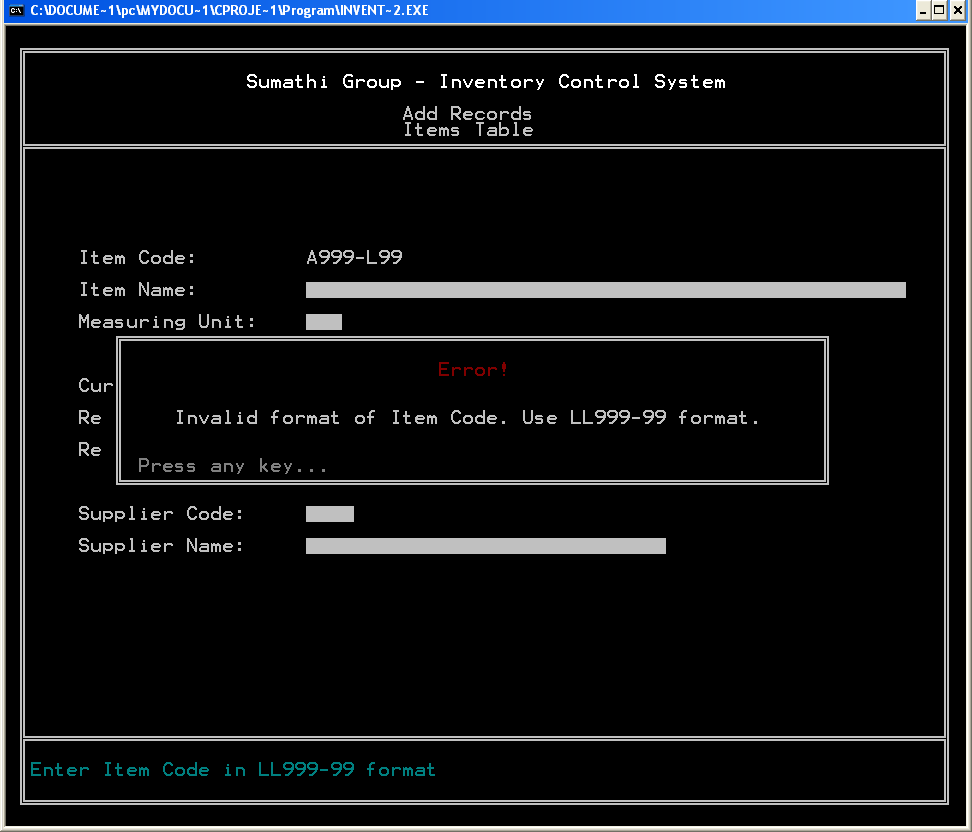
Inventory Control System user interface with a message box

Inventory Control System user interface

The following is the user interface of our Intelligent Car Park Management System, which we did as a group project in the university.
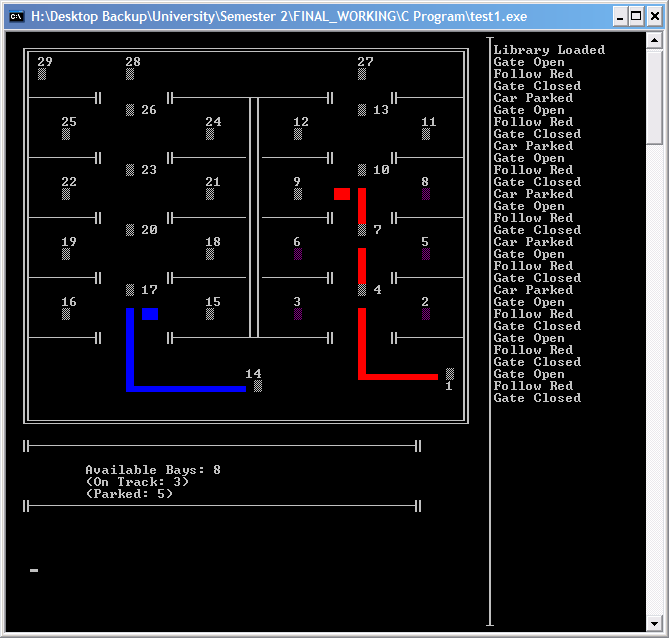
Car Park Management System User interface

Understanding the Console Window

The console window can be considered as a grid, with top left corner having the coordinates (0, 0).

In order to display our programs correctly, we need to set the size of the console window. Remember to follow this step to change the window size for your programs.

Right click on the title bar of the program and select Properties.

Right click on the title bar of the program and select Properties.

On the Layout tab, change the values as necessary. For this example, I will be using the settings that are shown on the screen shot.

Layout tab

The above procedure can be programmed into the code as well. For this refer the msdn for SetConsoleScreenBufferSize function (http://msdn.microsoft.com/en-us/library/ms686044(v=VS.85).aspx)

Alternative conio.h

We need some functions that are not implemented in the standard conio.h library. These include functions such as gotoxy(), getx(),gety() which basically manipulates the cursor position on the console window. There are a few alternate conio.h libraries available on the internet. I used the one which is available in the following forum by Arthur Christopher Watkins:

http://www.dynamicdrive.com/forums/showthread.php?t=35174

Or you can download a little bit modified version directly from here

It’s all about printf!

Now that you got the console window size adjusted, and alternate conio set up, it’s time to code!

Get an ASCII chart, and note the characters that can be used to draw lines, bends, etc. You can use the following code to print an ascii character.

int n=205;            //ascii code of the character
printf(“%c”,n);

Now you can use your creativity and imagination (and some loops of course :) ) to write functions that will print lines, text boxes, rectangles, etc. Here are some functions that I wrote:

#include <stdio.h>
#include "altconio.h"

void DrawHLine(int x,int y, int length);
void DrawVLine(int x,int y, int height);
void DrawFrame(int beginx,int beginy,int width,int height);

int main()
{
	clrscr();
	DrawFrame(3,3,10,10);
	DrawVLine(15,3,10);
	DrawHLine(3,15,10);
	gotoxy(0,20);
	system("pause");
	return 0;
}

void DrawHLine(int x,int y, int length)
/*
 * this function draws a horizontal line when
 * the x,y values of the starting point and length
 * is given.
 */
{
	int count;
	int currX=getx();	//get the currecnt cursor position
	int currY=gety();
	gotoxy(x,y);
	for(count=0;count<length;count++)
		printf("%c",196);
	gotoxy(currX,currY);	//put the cursor back in place
}

void DrawVLine(int x,int y, int height)
/*
 * this function draws a verticle line when
 * the x,y values of the starting point and height
 * is given.
 */
{
	int count;
	int currX=getx();	//get the currecnt cursor position
	int currY=gety();
	gotoxy(x,y);
	for(count=0;count<height;count++)
	{
		gotoxy(x,y+count);
		printf("%c",179);
	}
	gotoxy(currX,currY);	//put the cursor back in place
}

void DrawFrame(int beginx,int beginy,int width,int height)
/*
 * this function draws a box when the
 * x,y values of the top left corner
 * and hieght and width is given, and
 * clears the inside of it.
 */
{
	int count,i,j;
	int currX=getx();	//get the currecnt cursor position
	int currY=gety();
/*-------Top Horizontal line------*/
	gotoxy(beginx,beginy);
	printf("%c",201);
	for(count=1;count<=width-2;count++)
		printf("%c",205);
	printf("%c",187);

/*-------Left verticle line-------*/
	gotoxy(beginx,beginy+1);
	for(count=1;count<=height-2;count++)
	{   printf("%c",186);
		gotoxy(beginx,beginy+1+count);
	}

/*-------Right verticle line------*/
	gotoxy(beginx+width-1,beginy+1);
	for(count=1;count<=height-2;count++)
	{   printf("%c",186);
		gotoxy(beginx+width-1,beginy+1+count);
	}

/*-------Bottom Horizontal line----*/
	gotoxy(beginx,beginy+height-1);
	printf("%c",200);
	for(count=1;count<=width-2;count++)
		printf("%c",205);
	printf("%c",188);

/*-------Clearing inside the frame---*/
	for(i=1;i<=height-2;i++)
	{
		gotoxy(beginx+1,beginy+i);
		for(j=1;j<=width-2;j++)
			printf(" ");
	}
	gotoxy(currX,currY);	//put the cursor back in place
}

Note that the alternate conio.h library file (which is named as ‘altconio.h’) is in the same directory as my source file, so it is included as:

#include “altconio.h”

I’ll leave you with that for now. Try out the setcolor() function if the altconio.h header file to try out different colors. Experiment with these codes and have fun :)

#include <stdio.h>
#include “altconio.h”void DrawHLine(int x,int y, int length);
void DrawVLine(int x,int y, int height);
void DrawFrame(int beginx,int beginy,int width,int height);int main()
{
clrscr();
DrawFrame(3,3,10,10);
DrawVLine(15,3,10);
DrawHLine(3,15,10);
gotoxy(0,20);
system(“pause”);
return 0;
}void DrawHLine(int x,int y, int length)
/*
* this function draws a horizontal line when
* the x,y values of the starting point and length
* is given.
*/
{
int count;
int currX=getx();    //get the currecnt cursor position
int currY=gety();
gotoxy(x,y);
for(count=0;count<length;count++)
printf(“%c”,196);
gotoxy(currX,currY);    //put the cursor back in place
}void DrawVLine(int x,int y, int height)
/*
* this function draws a verticle line when
* the x,y values of the starting point and height
* is given.
*/
{
int count;
int currX=getx();    //get the currecnt cursor position
int currY=gety();
gotoxy(x,y);
for(count=0;count<height;count++)
{
gotoxy(x,y+count);
printf(“%c”,179);
}
gotoxy(currX,currY);    //put the cursor back in place
}
void DrawFrame(int beginx,int beginy,int width,int height)
/*
* this function draws a box when the
* x,y values of the top left corner
* and hieght and width is given, and
* clears the inside of it.
*/
{
int count,i,j;
int currX=getx();    //get the currecnt cursor position
int currY=gety();
/*——-Top Horizontal line——*/
gotoxy(beginx,beginy);
printf(“%c”,201);
for(count=1;count<=width-2;count++)
printf(“%c”,205);
printf(“%c”,187);

/*——-Left verticle line——-*/
gotoxy(beginx,beginy+1);
for(count=1;count<=height-2;count++)
{   printf(“%c”,186);
gotoxy(beginx,beginy+1+count);
}

/*——-Right verticle line——*/
gotoxy(beginx+width-1,beginy+1);
for(count=1;count<=height-2;count++)
{   printf(“%c”,186);
gotoxy(beginx+width-1,beginy+1+count);
}

/*——-Bottom Horizontal line—-*/
gotoxy(beginx,beginy+height-1);
printf(“%c”,200);
for(count=1;count<=width-2;count++)
printf(“%c”,205);
printf(“%c”,188);

/*——-Clearing inside the frame—*/
for(i=1;i<=height-2;i++)
{
gotoxy(beginx+1,beginy+i);
for(j=1;j<=width-2;j++)
printf(” “);
}
gotoxy(currX,currY);    //put the cursor back in place
}