I didn’t want to keep my laptop or the computer switched on 24/7 to download torrents. So downloading my torrents was the first task I wanted my Raspberry Pi to do. The torrents will be downloaded to an external hard disk or a pen drive. Transmission provides a web UI which makes it easier to remotely add and monitor downloads. As for initial preparations, the RPi has a static IP and SSH was enabled. You might want to look at my previous post on initial setting up stuff.

Preparing and Mounting the External Storage

I used one of my pen drives that is formatted as an NTFS file system. Connect the external storage to the RPi. Open a SSH session and type:

$ sudo fdisk –l

This lists all the hard drives that are connected and you will be able to find your external storage.

fdisk

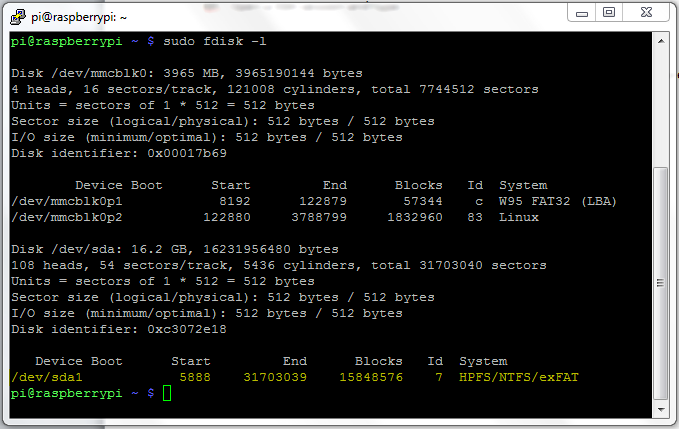
Note the ‘Device Boot’ record (Mine is ‘/dev/sda1′ ).

Now let’s mound the drive. All mounted drives are accessed though /media/ folder.

$ cd /media/
$ sudo mkdir downloads
$ sudo mount –t ntfs-3g /dev/sda1 /media/downloads

If it says that ntfs-3g is an unknown type or gives a similar error message, install it by:

$  sudo apt-get install ntfs-3g

Now the device is mounted. However we want RPi to mount it automatically every time it boots up. For this you need to edit the ‘fstab’ file and enter the details of your device.

To edit the file use:

$ sudo nano /etc/fstab

It will bring up the file which contains a table as follows:

fstab

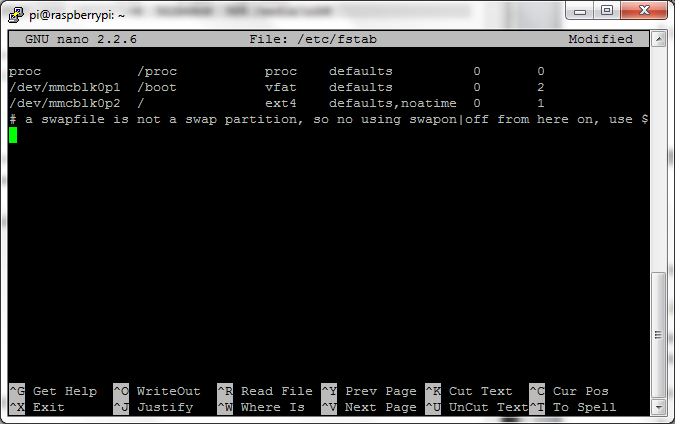
Enter the following record at the end of the table:

/dev/sda1       /media/downloads        ntfs-3g defaults        0       0

Save and exit.

This is an excellent reference on this matter.

Now your external storage is ready.

Installing and configuring Transmission

$ sudo apt-get install transmission-daemon

We need to do some configurations. For this we nead to stop the daemon and edit the settings file.

Stop the daemon using:

$ sudo service transmission-daemons stop

Bring up the settings file by:

$ sudo nano /etc/transmission-daemon/settings.json

Set the download directory to your external device that was mounted:

"download-dir": "/media/downloads",

You can enable or disable RPC Authentication. If you enabled it you can set the username and password here as well. (The plain text password entered will be changed to the hash value and stored when transmission starts up).

By default, transmission only allows a white listed set of IPs to access it. You can either enter your IPs to the whitelist or disable this.

Save and exit the settings file and start the daemon:

$ sudo service transmission-daemons start

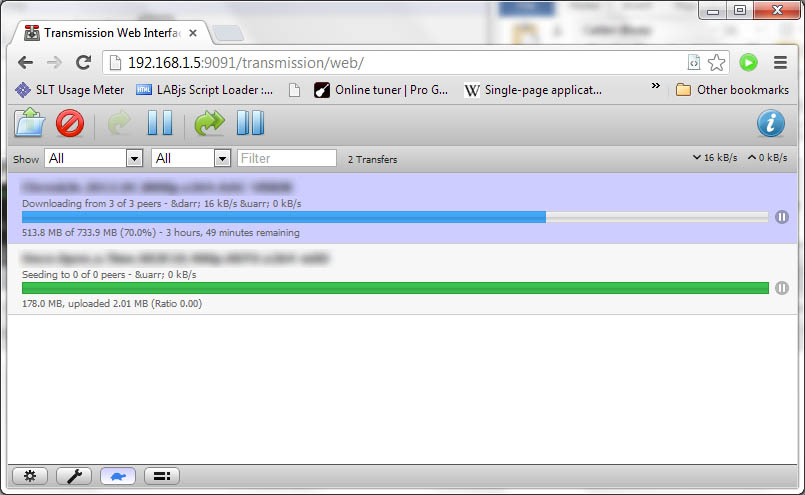
Now open up your web browser and point to the transmission url. It should be of the format:

rpi_ip:9091/
Ex: 192.168.1.5:9091/

You can now upload your torrent files and let the RPi download it!

Transmission Web UI

I have noticed that sometimes an error occurs: “Error: Input/output error” To fix this re boot the RPi and ‘Verify local data’ of the torrent. This of course is not a permanent fix. I have tried the fixes here: http://stevenhickson.blogspot.com/2012/10/fixing-raspberry-pi-crashes.html and I’m still looking in to this issue.

Update: I’ve applied the fixes on the above link and reduced the number of peers in transmission. But apparently the main reason for the IO errors were with my Transcend flash drive. I tried with another (unbranded cheep) flash drive, and things are now working like a charm :)

Update 2: I am using a SATA hard disk to store the downloads.

Accessing Downloaded Files

You can setup a Samba server on RPi to access your downloaded files from other machines. This article provides a comprehensive guide on how to set this up.

Additional References: 

http://stevenhickson.blogspot.com/2012/10/using-raspberry-pi-as-web-server-media.html
http://cumulativeparadigms.wordpress.com/2012/08/13/tutorial-1-setting-up-rpi-as-a-torrent-server/

So I got my RaspberryPi today, and would like to share my RaspberryPi setup plan. These are some steps that you can use to kick start your RaspberryPi journey!

First Boot

Raspberry Pi’s Quick start guide explains the steps that are necessary for the first boot.

Setting up a static IP

You will most probably require a static IP to your RaspberryPi so you can access it over the network. To set up a static IP,  open up the terminal and enter:

$ sudo nano /etc/network/interfaces

This will allow you to edit the file. Change

iface eth0 inet dhcp

to

iface eth0 inet static

Below it, enter the following lines

address YOUR_STATIC_IP
netmask 255.255.255.0
gateway 192.168.1.1

After entering these lines, save the file (Ctrl+O) and exit (Ctrl+X)

Then reboot by entering:

$ sudo reboot

To check your IP enter:

$ ifconfig eth0

Enabling Remote Desktop

You will probably need to remotely log in to your machine. I followed this post and successfully configured remote desktop: http://www.raspberrypiblog.com/2012/10/how-to-setup-remote-desktop-from.html

Changing the default password

It is always good to change the default password (‘raspberry’). To do this enter the following on the terminal:

$ passwd

I’ve got an Arduino UNO board, and a Hitachi HD44780 type LCD. I wanted to write a python program to communicate with the Arduino board. The board can be connected to the computer via USB, and it appears as a COM port. Therefore we can easily communicate with the Arduino serial interface with python.

My aim is to create a python program that takes the input from the keyboard and display on the LCD. The LCD is connected to the Arduino board as mentioned in the Arduino example:

Circuit Diagram

The following is the code for the Arduino:

// include the library code:
#include <LiquidCrystal.h>

// initialize the library with the numbers of the interface pins
LiquidCrystal lcd(12, 11, 5, 4, 3, 2);

void setup() {
  Serial.begin(9600);
  lcd.begin(16, 2);
  lcd.print("start");
}

void loop() {
  if (Serial.available()) {
    delay(100);  //wait some time for the data to fully be read
    lcd.clear();
    while (Serial.available() > 0) {
      char c = Serial.read();
      lcd.write(c);
    }
  }
}

To access the serial ports you need to set up the pySerial module for python. The Python code:

import serial
import time

s = serial.Serial(11, 9600) #port is 11 (for COM12), and baud rate is 9600
time.sleep(2)    #wait for the Serial to initialize
s.write('Ready...')
while True:
    str = raw_input('Enter text: ')
    str = str.strip()
    if str == 'exit' :
        break
    s.write(str)

I’m on a windows machine, and by default the Arduino is connected to COM12. Note that we need to wait for a little while after initializing the serial connection.

Arduino Board and the LCD Ready for input

Arduino Board and the LCD Ready for input

Arduino Board and the LCD, Python message is displayed

Arduino Board and the LCD, Python message is displayed

Python Console

Python Console

Gist: https://gist.github.com/4460208

Reference: http://playground.arduino.cc/interfacing/python

Thought I’d share some resources that I followed when learning about Single Page Applications.

Architecture and Design Resources:

Scalable JavaScript Application Architecture  – by Nicholas Zakas

Slides: http://www.slideshare.net/nzakas/scalable-javascript-application-architecture

This is a great inspiration for BoilerplateJS and an excellent presentation. A must watch if you are stepping in to Single Page App development.

Patterns For Large-Scale JavaScript Application Architecture by Addy Osmani Contains some good design patterns for JavaScript Applications


Tools and Libraries:

There are a lot of tools, frameworks and JS libraries out there. This is by no way a complete list, but these are some stuff that I’m familiar with.

As I mentioned in an earlier post, Single Paged Applications provide several advantages to the user. They provide a smooth and fast user experience.

Having worked in a large scale single paged application development project and co-authoring BoilerplateJS, I’ve realized Single Page Applications are easy to de-couple and modularize. For me, development wise, it is very easy to manage Single Paged Applications.

You may start your desktop application or web application with a clean code base, with a nice modularized architecture with a good separation of concerns. But I have seen many applications where the code starts to get messy as the development progresses. Given you have the right tools and follow good practices, a Single Paged Application is best type of application for a clean and maintainable code base.

Unlike traditional web applications, the presentation logic and the main logic of the application are highly de-coupled.

On a Single Page Application, the server-side will be responsible for:

  • Handling CRUD (Create, Read, Update and Delete) operations
  • Executing different operations and workflows (these may include changing states of entities, updating database records)
  • Authentication and Authorization (this should always be done on the server side to ensure that the requests are legitimate)
  • Validation of web requests
  • Providing an interface for the client application to perform operations (typically done via a REST API)

With the help of proper frameworks the above tasks can be handled easily on the server side. Entities that are related could be treated as modules. Aspect Oriented Programming techniques can be used for authorization.

The client side will be responsible for:

  • Populating and rendering the UI with proper data
  • Access the server via AJAX
  • Perform client side routing
  • Perform client side validation

If a proper REST API is defined, back end developers and front end developers can work simultaneously on the project easily. And since the front end and the back end are de-coupled by the REST API it is easy to change these layers without significant modifications.  Scaling up the back end or providing a new interface can be done with minimal impact.

This kind of separation where the server is treated as a service provider and the presentation logic purely done on the client side with JavaScript, makes the application design very straightforward and clean.

I am still an undergraduate, but I was involved in developing several applications, as projects and course work in the university and as products for several clients while I’m in the university and during my internship. I have seen that more and more enterprise applications are moving towards the web and have seen a trend towards enterprise applications being developed as Single Paged Applications.

Me, being an undergraduate is far from being an experienced software architect, but I have experience in developing the above types of applications, so here is my take on them.

Desktop applications may be connected through the internet or an intranet, and there may be server software or a database server in a central location. We have been used to these types of applications for a long time. They are reliable and very stable. But things have got complicated lately. There are a couple of popular operating systems, and most enterprises want their systems to be accessed by all such operating systems and devices as well. Developing separate native applications for different platforms is extremely costly and impractical. I believe that this is a major reason behind web applications being popular among enterprise application developers.

Web applications reside in a web server and accessed by users via the internet or an intranet and viewed on a web browser. Web applications provide some significant advantages. As mentioned above being platform independent is one of them. Unlike desktop applications they do not need special roll out or deployment procedures. Therefore deploying updates and new versions are very easy. The load on client machines is pretty low as well.

However there are several drawbacks of web applications. The user experience tend to be discontinuous because the pages need to refreshed each time an operation occurs, and response time is very slow because the webpage needs to be sent from the server. An un-interrupted connection to the server (or the internet) is required as well. But this however is minimized with HTML5’s new local storage feature.

Single Paged Applications tries to eliminate some of the drawbacks of traditional web applications.

A single-page application (SPA), also known as single-page interface (SPI), is a web application or web site that fits on a single web page with the goal of providing a more fluid user experience akin to a desktop application.

In an SPA, either all necessary code – HTML, JavaScript, and CSS – is retrieved with a single page load, or partial changes are performed loading new code on demand from the web server, usually driven by user actions. The page does not automatically reload during user interaction with the application, nor does control transfer to another page. Updates to the displayed page may or may not involve interaction with a server.

– Wikipedia article on Single Paged Applications

The following figure shows the architecture of a typical SPA:

Typical Single Paged Application Architecture

Since most of the UI rendering and manipulation happens on the browser it gives the user an uninterrupted experience, and since the load on server side is minimum, these applications tend to be very scalable. The Single Paged Applications tend to have a lot more modularized maintainable code, since the presentation layer is decoupled from the business logic and controllers. However Single Paged Applications have a long way to go and the technology is still maturing. But my bet is that we will see more and such applications in the future.

Raspberry Pi is a 25$ (around 50$ with taxes and delivery charges to Sri Lanka) credit card sized computer running a Linux distribution. I was introduced to this cool, cheap computer sometime back, and it caught my interest. Just a few days back, I placed my order for a Pi and waiting for it to be delivered.

It is intended to be used as a cheap computer for kids to start learning, but it has been put to use in many other projects. It is low powered, and can be switched on 24/7, which means it’s ideal to run a small web server or a media server and do some automation tasks.

The current Model B comes with a 700MHz CPU, 512 RAM, 2 USB ports, HDMI and RCA video outs, and a 3.5mm audio out. It uses a SD/MMC for onboard storage. It has 8 GPIO (General Purpose Input/Output) pins, which means you can interface different devices such as relays and LCD displays and LEDs easily. It is pretty neat for a small computer that can run a linux OS.

There is an active community around the project and a lot of guides and projects. I hope to give RaspberryPi a shot and see what I can do with it!